Conditional logic is used to reveal specific custom fields in the vWork mobile app based on what selection is made in a pick list or checkbox. This is useful when you have a complex job with decisions or options that determine the other information your mobile worker needs to capture.
Conditional logic can help simplify the job by only showing the fields your mobile worker needs based on the options they choose.
Conditional logic is an optional feature that you can use to enhance the use of custom fields in your jobs. If you want to find out more about it or add it to your vWork account, please contact support@vworkapp.com. One of our team will be in touch to talk with you about your requirements.
In this article
This explains how to set up and use conditional logic with custom fields.
The topics covered are:
- How to set up conditional logic
- What does conditional logic look like on the vWork Mobile App?
- Good to know
You can read this article from top to bottom to get a thorough understanding of conditional logic - but if you prefer to brush up on just a few topics, click the links above to go directly to them.
You can click this icon at any time to come back to this topic list.
How to set up conditional logic
Conditional logic is set up in the Custom Field tab in the job template. The components that are used with conditional logic are:
- The Pick List, Multi-value Pick List, or Checkbox type custom fields - when conditional logic is enabled for these custom field types.
- Section Headers to divide custom fields into sections.
Conditional logic uses If>Then logic:
If > {select the right condition to trigger the logic in the custom field},
Then > {show the extra section with the additional custom fields}.
A conditional logic example from a job template
Below is an example of conditional logic in a job template using a Yes/No Pick List custom field. We have set this up with four sections:
- Scope Site Access, the first section, is the parent section. It contains the conditional logic enabled Yes/No Pick List type custom field.
(We have set Permissions for this custom field as Required. As a result, this field has a red shaded background.)
In the mobile app this section heading shows when the job Fields screen is first opened for a job based on this template. No other subsections are visible to start with. - Heavy Vehicle Access Issues and Other Access Hazards, the next two sections, are both subsections of the parent section. They are identified as subsections by this icon in the Section Header
 .
.
Initially, neither subsection is visible to a mobile worker for a job based on this job template. The subsection that opens is determined by the option selected in the Yes/No Pick List type custom field. Only one of these subsections can be open in the vWork Mobile App from this custom field.
- The Heavy Vehicle Access Issues section only opens on the vWork mobile app when No is selected from the Yes/No Pick List. (See the Blue arrow.)
- The Other Access Hazards section is only visible when Yes is selected from the Yes/No picklist. (See the Red arrow.)
- The final section, Blocked Access, is a subsection of Heavy Vehicle Access Issues.
It only opens if the optional checkbox, Access Blocked, is completed in the Heavy Vehicle Access Issues section. (See the Green arrow.)
Note: The checkbox custom field that opens the Blocked Access section shows a cream shaded background. All fields that have conditional logic enabled have this cream background unless they are red because they were assigned the Required permission.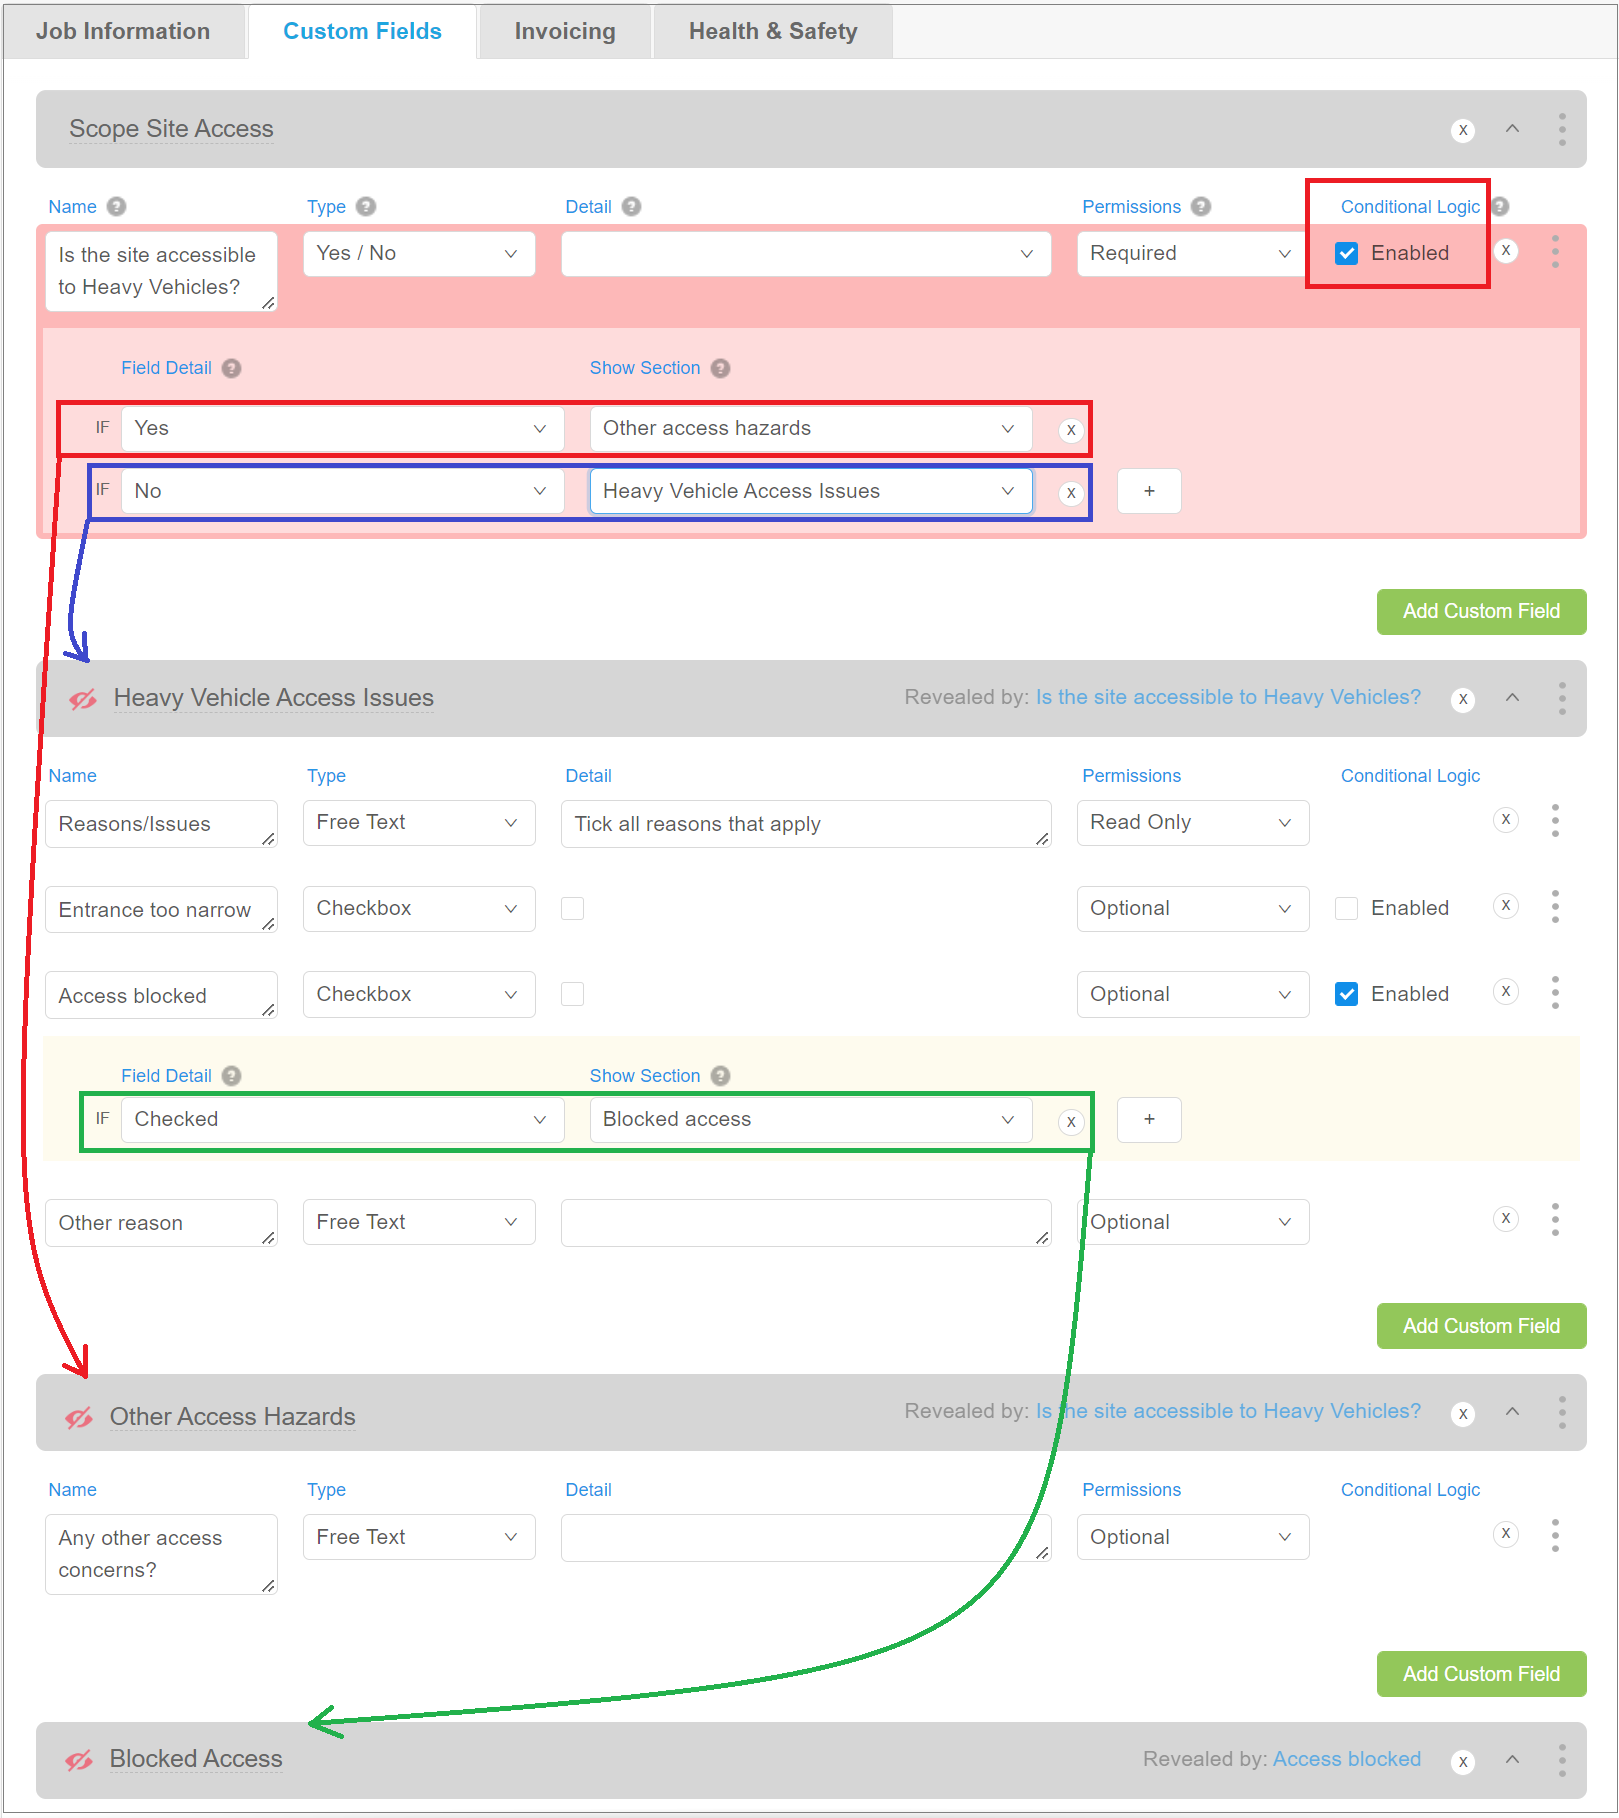
Map out the workflow
When you want to use conditional logic, it is a good idea to plan the workflow first so that you can work out what section headers you need and what custom fields will be grouped under the section headers. Here is the planning we did for the example shown above.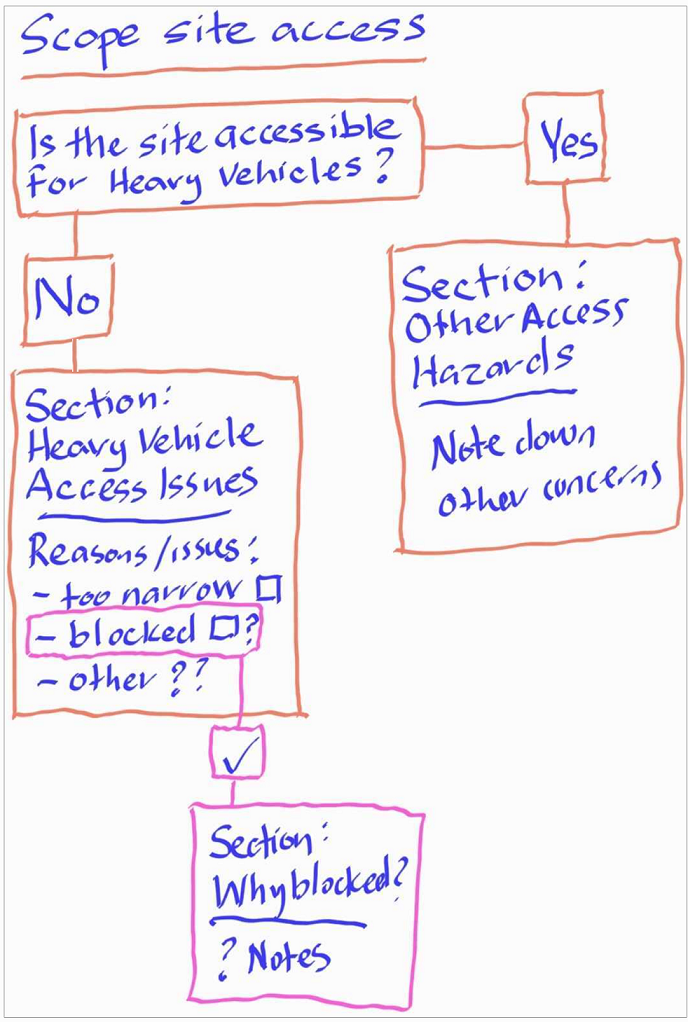
Add sections and custom fields to the job template
Once you know the workflow you can use this knowledge to set up conditional logic in the job template.
To use conditional logic with custom fields:
- Choose, or create, the job template.
- Go to Settings>Templates and click Add Job Template for a new template,
- or open an existing template to modify it.
Note: To find out more about creating a job template, please see the article: How do I create a Job Template?
- Click the Custom Fields tab to open it.
- First, set up the Custom Field sections to match the workflow for the job. (See the topic above, Map out the workflow).
- Click Add Section Header to create a new section. Enter a name for the section in the Section Header.

- Click Add Section Header to create a new section. Enter a name for the section in the Section Header.
- Add the custom fields to each section and click the conditional logic Enabled checkbox to set up conditional logic for the Pick Lists and Checkbox type custom fields that you are using. See the topic, Enable conditional logic on a custom field, below for more information.
Tip: You can’t move custom fields between sections so planning where you want to put the custom fields before you create them is really helpful. - Click Create or Update to save the changes.
Enable conditional logic on a custom field
When you add a checkbox or pick list custom field to a template you have the option to enable conditional logic for them. When enabled, the custom field has a cream shaded background, or, if the custom field has the Required permission, it has a red shaded background. We show both of these backgrounds in the examples below.
Tip: It is good practice to set the Sections up in the job template before you enable conditional logic for custom fields. See the topic, Add Sections and Custom Fields to the Job Template, above.
To enable conditional logic for a custom field:
- Click the conditional logic Enabled checkbox to add a checkmark to it.
This opens a new area below the custom field where you can specify what happens when a specific option is selected in the custom field (IF > Then logic).
- Select the IF value and the name of the section you want to show when the IF option is chosen in the custom field.
In this example, if the checkbox is checked (completed with a checkmark on Android, or is toggled On in IOS) then the Blocked Access section will show.
- For pick list custom fields you can have multiple conditional logic options that show different sections depending on what pick list item is selected.
In this example, we added a required Yes/No Pick List custom field. We want a different section to show when Yes is selected from the section that will show when No is selected.
When we first enable conditional logic we have one condition option. We will need two: one for Yes and the other for No.
To add a second condition option, enter the details for the first condition option then click to add a line for the second condition option.
- Enter the details for the second condition option. In this example, we have added: IF No THEN show the Heavy Vehicle Access Issues section.

Now different sections will show for the Yes and No options in the Yes/No picklist on the vWork mobile app.
What does conditional logic look like on the vWork mobile app?
Android device
Using the same example as above, here is what the job looks like on the vWork mobile app when the worker views the Fields screen for the job in Android.
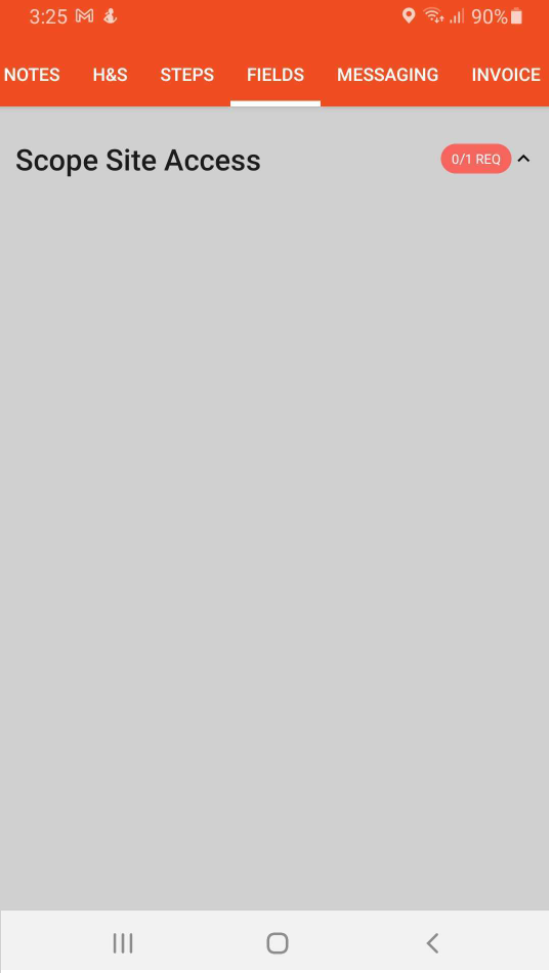
- Tap the Fields tab from within the job to view the custom fields. The Scope Site Access section header shows but the custom fields are hidden.
Tap to expand the section.
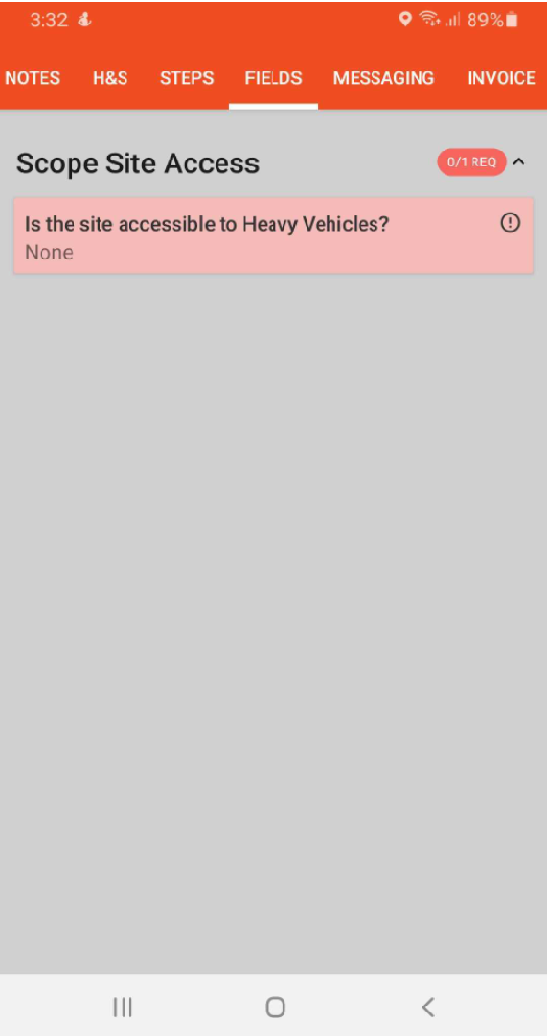
- Tap the Section Header, Scope Site Access, to see the custom fields in this section. There is only one custom field, Is the Site Accessible to Heavy Vehicles?. This is a required field.
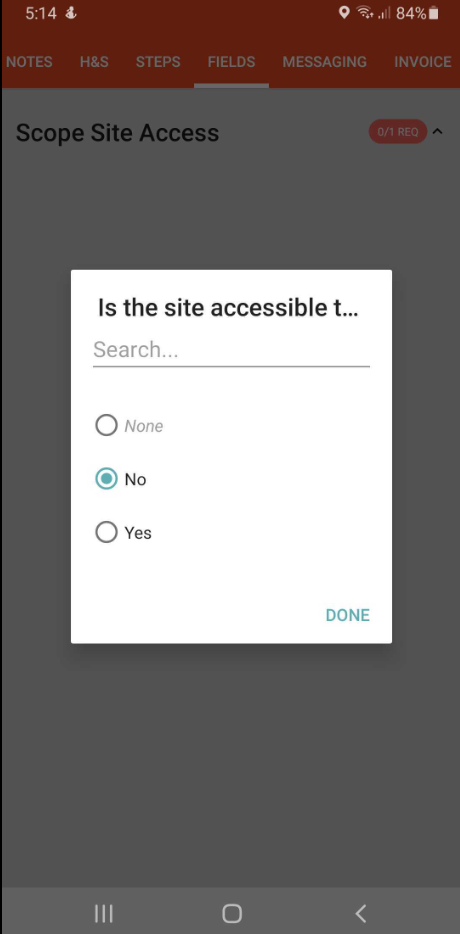
- Tap the custom field to see the pick list options. Make your selection then tap Done.
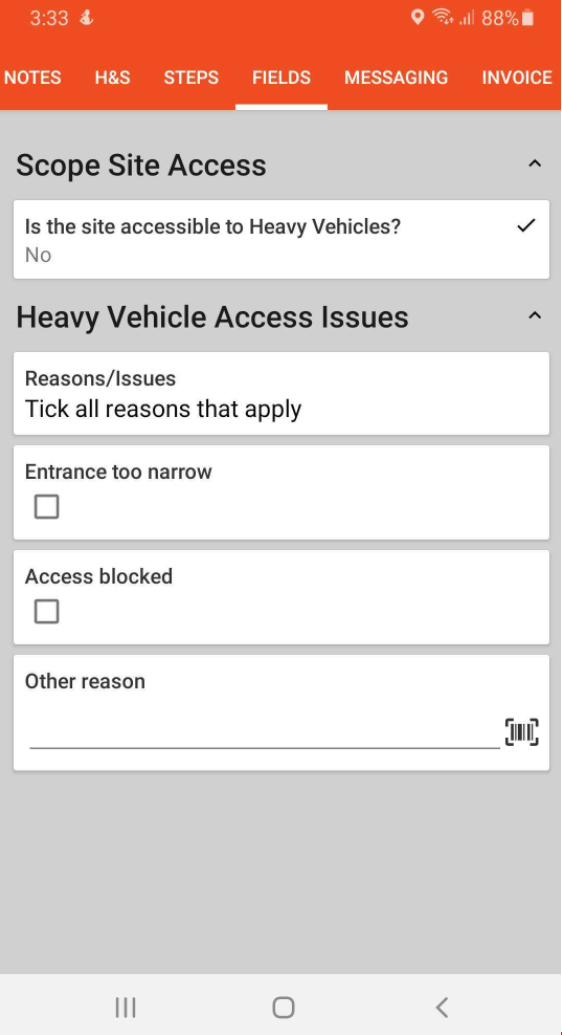
- Here the No option was selected from the Yes/No pick list, Is the site accessible to Heavy Vehicles?. This opened the Heavy Vehicle Access Issues section. We can now complete the custom fields from this section.
IOS device
This is the same example but on an IOS device.
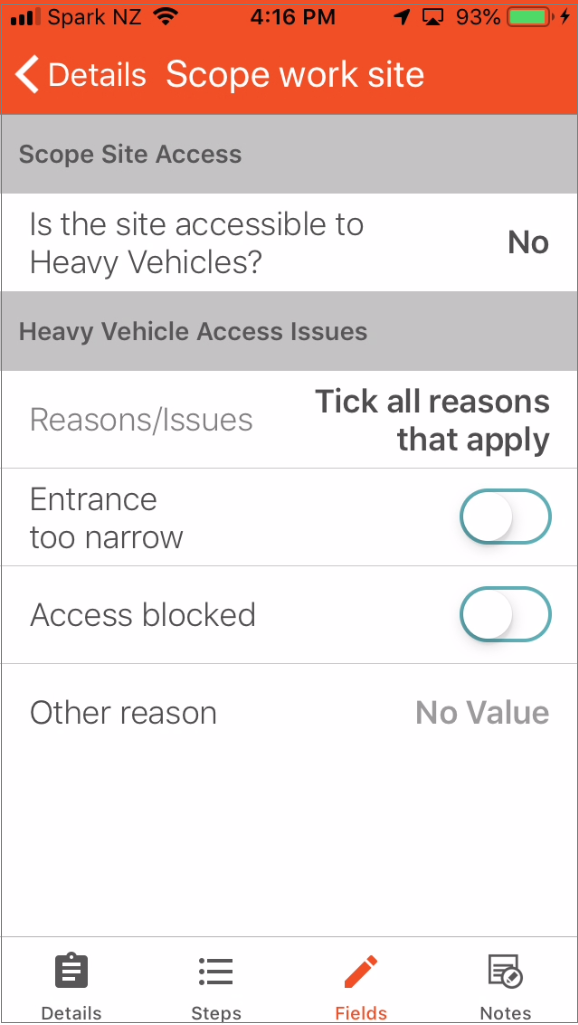
- Tap the Fields icon from within the Job. The Scope work site section shows with custom fields in this section listed.
In this example, there is only one custom field: Is the site accessible to Heavy Vehicles? It is a Required field.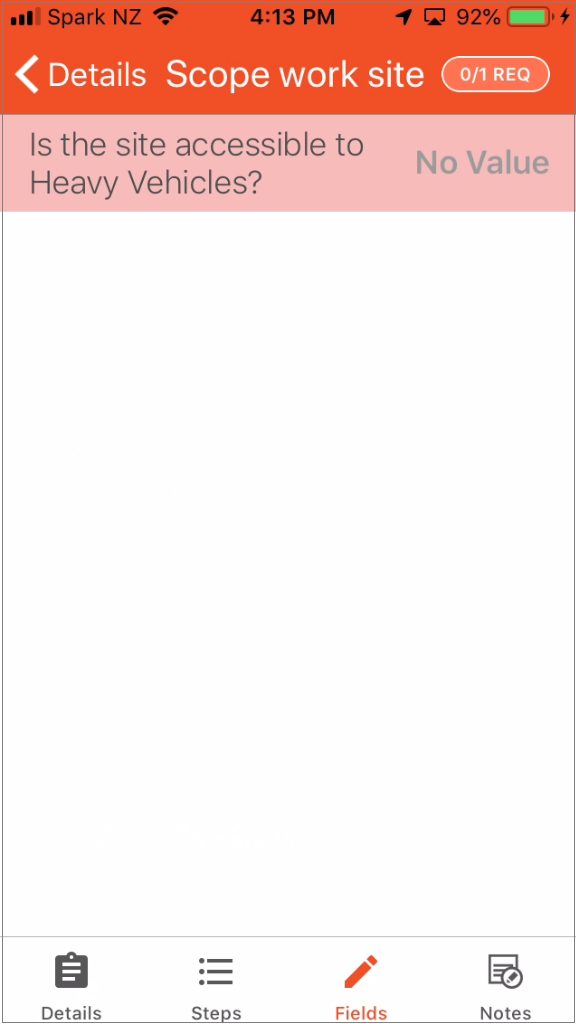
- Tap the custom field to show the pick list options. Select an option.
In this example, we selected No.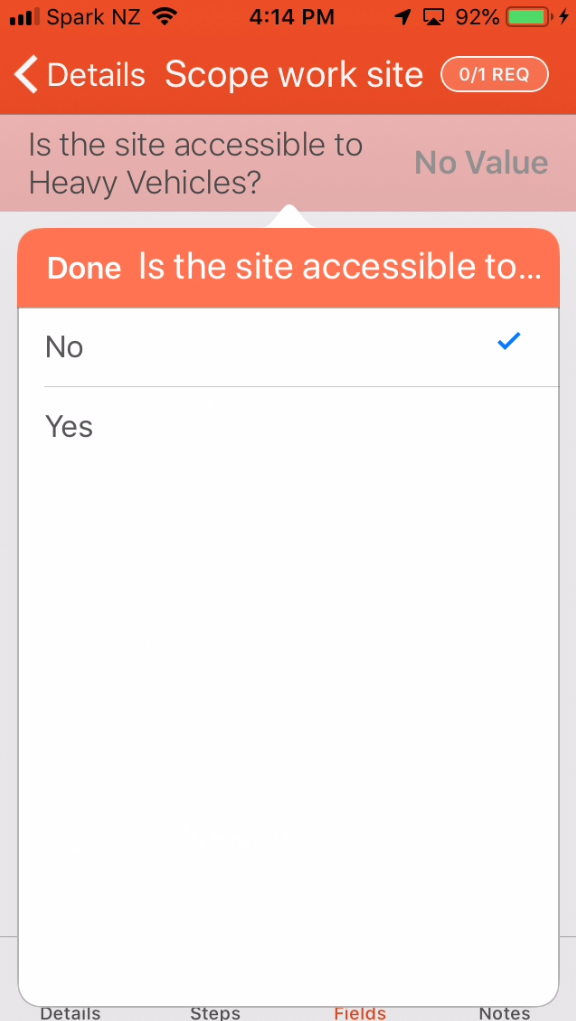
- Tap the custom field again to go back to the Fields list. The Heavy Vehicle Access Issues section now shows. The checkboxes in this section are shown as toggle buttons. The mobile worker can now toggle these on for every option that applies.
Good to know
Here are some tips and tricks to help you get the most from using conditional logic.
- Plan your workflow beforehand. This makes setting up the template much easier, helps you plan how to make your template layout as simple and usable as possible, and reduces the chance of you making an error in the setup.
- It's best to keep your use of conditional logic simple. Conditional logic adds complexity which can slow things down for your workers and dispatchers. Lots of conditional logic can often result in lots of custom fields. This can make things difficult for workers and slow down your job processing. Keeping it as simple as possible is always best.
- Create sections before adding custom fields. This makes setting conditional logic for your custom fields faster and simpler.
- Sections that can be revealed by a conditional logic selection show this
 in the Section Header to help you identify them. They also say what custom field is used to reveal them on the right-hand side of the banner. You can click the blue writing to highlight the custom field that reveals the section.
- You can have fields that use the required permission in sections that may be hidden by conditional logic. Required fields in hidden sections will only be required if the section becomes visible.
- When you use pick list values in the conditions in your job templates, you can’t remove or change the pick list values until all jobs that use them are closed. This can be tricky.
- When you use checkboxes in the template be aware that these show as toggle buttons on iOS Devices and checkboxes on Android devices.
- When you have finished creating your job template, create some test jobs to test all the conditional logic options before you start using the template for real jobs. This lets you see if you can simplify the template and also identifies accidental errors in your workflow.
